Signal Boost - Have You Done Your Kegels Lately?

Posted by Miss.Anthropic | Posted in | Posted on 1:12 PM

0

Did you know that both women and men can do kegel exercises?

If you're suffering from event or age related sexual dysfunctions and frustrations, whether you're recovering from childbirth, surgery, going through menopause, or experiencing weaker erections - you should be doing kegels.  Eventually we will all suffer from age related sexual woes, and kegels can help turn back the clock.

If you're young - kegels are still for you!  You can make sex better for you and your partner.  Not only will you have a tight vagina or a firm erection, you can prevent issues like incontinence from ever happening.


EdenFantasys Presents: Better Sex Starts Here! Your Guide to Kegels


Sex toys - EdenFantasys adult toys store

Quickie Review of Julep May Box - Jazz Collection Full Set

Posted by Miss.Anthropic | Posted in | Posted on 6:11 AM

0

I'm still very, very busy with unpacking, painting, etc, and will probably still be busy for several weeks.  I'm really missing painting my nails, but honestly my hands are in awful shape right now and if I took the time to paint them right now, they'd be shredded off in one day.  Maybe my toes soon.  But I could not resist at least  taking a look at my Julep box.

This is the first month I upgraded to the full set, and I'm somewhat having buyer's remorse, but there are a few great ones in here.

Original

Gabrielle - dusty dark purple creme - very opaque, may be a one-coater, nice but unfortunately closer to some polishes I already own than I realized, for one it's pretty close to Barry M Dusky Mauve

Alice - dusty yet slightly frosty lilac creme - I don't actually have many light purples, so a good addition for me

Coco - oxblood jelly/creme - I had a bad feeling this was going to not differentiate itself from the several other oxbloods I own and I was right, and not a superior formula either.  A very boring oxblood.

Myrtle - classic red jelly/creme - This one I like more than I thought I would.  Absolutely the most perfect and flattering classic red.  It has pink undertones, like the red lipstick in the set and the two should work well together, and look good on anybody.  A little thin though, going to need several coats for opacity.

Millie - navy blue creme (maybe a bit of purple undertone) - Not hugely different from Eloise, though Eloise is more of a dark peacock blue.  Very opaque, 1-2 coats should do it.

Clara - flesh-y pastel peach creme - I don't care for this color and not sure how much use I will get out of it. I can't see this being a very flattering color on most people.  Pretty much just super pale people.  It's too bright and cheap looking.

Zora - very light pink creme w/ slight shimmer - a bit disappointing for me, it is almost identical to Penelope, though an improvement at least - just a bit less bubblegum, more classy and classic.  Wish it was more opaque.

Etta - peridot green metallic - this was an add-on option.  I like it!  It's a bit thin, but I think it will look interesting layered over other colors too.

Zelda - rose gold metallic - Definitely my favorite out of the set!  Very pretty and vibrant.

Paris - vintage-y large hex glitter, yellow to full-rainbow-spectrum-flash hexes in clear base.  I am really so sick of glitter right now, especially large glitters, but will probably use occasionally for an accent nail.  The color is not quite to my taste, but it definitely evokes the feeling of 1920's chintzy costume jewelry.

I do have to say the packaging on this set was TOO GORGEOUS.  Like I didn't even want to throw it away, or touch it.  Too pretty.

I have only tried out the red lipstick in the two sets, Lady in Red.  Just briefly.  It is a flattering universal red, as Julep advertised.  I seriously just barely feathered it onto my lips with the lightest touch and it is amazingly opaque and bright.  Maybe too much for me.  I lean towards very nude, natural colors (though I like shine and glitter) most times for lipstick.  But I have very few red lipsticks and should try to be more daring some days.  I look forward to trying out the other colors and field testing them against food.

The lipstick did have a unpleasant chemical/plastic taste to it, like they didn't add anything to it to make it more pleasant, but that should discourage me from licking it off.  I guess that does make it more vintage-feeling, since makeup used to be more like that, before it became more common to add candy flavors/scents or mint flavors, etc, to lip products.

I have not yet sampled the lip scrub.  I do kind of wish the packaging was something less easy to contaminate with my fingers, but it is super pretty and retro.  The whole makeup packaging reminds me so much of stuff my mom would have bought in the 80s from expensive makeup counters.

I have not used the Julep mascara either.  I have a lot of mascara right now, so probably won't open it up for awhile.  I would have preferred a brown-black to a jet black.  I don't like jet black mascara or eyeliner, I prefer dark brown.

Julep Coupon Code

Posted by Miss.Anthropic | Posted in | Posted on 6:30 PM

0

My manicures have been on hold while I'm moving, but I wanted to mention that you can use the code "FREEMAVEN" to get your first Maven box of Julep Nail Polish for FREE instead of $20.  I've been very happy with the Maven program so far.  You can skip any month where you are not interested in the polish and/or beauty offerings that month and you won't lose your bonus points that you can use for getting free items or a free box or free upgrade.

If you don't mind using me as a referral, please click though this link HERE.  Otherwise just go to Julep.com.

The box for May is really great! http://www.julep.com/collections/jazz-collection.html/  I can't wait to try it out.

It's a "Jazz Age" theme with vintage-type colors, which is what I really like.  I skipped out on the last two boxes because they were not to my taste, but I don't mind because I saved out on not spending the money those two months.  ;)  When I do like the box, it's a good value, and most of the polishes have been of good quality and color.

Hits Zeus & Julep Daphne

Posted by Miss.Anthropic | Posted in , , , , | Posted on 6:00 PM

0


Hits Zeus is a high quality black holographic at a low price for a holo ($8).  It's simply gorgeous.  The holographic is high, under light (but pretty nonexistent indoors and not under light).  And it wore like iron.  Had on for a week and it had not even started wearing down at the edges!

Julep Daphne is a green-leaning turquoise cream.  It wore pretty well, but did start chipping after about 4 days.

Both were super easy to remove and didn't stain the nails.


e.l.f. Desert Haze & Hare Bury the Hatchetfish

Posted by Miss.Anthropic | Posted in , , , | Posted on 5:42 PM

0


e.l.f. Desert Haze is one of my favorite e.l.f. nail polish shades.  I have found them pretty hit or miss, but I can't complain about the price (approximately $2, though e.l.f.'s website is almost constantly running coupon codes that can cut it down a lot cheaper for a semi-big order).  It's a very flattering neutral nude, almost patent-leather like color.

Unfortunately I cannot say that it ended up being a very good match up with Hare Polish in Bury the Hatchetfish.


They just didn't mesh with each other at all.  Desert Haze is all class and safe choices and formality, while Bury the Hatchetfish is grunge and dressing down.  I like both colors but I won't wear them together again.

e.l.f. Desert Haze was easy to work with, and goes opaque fast.  Hare Bury the Hatchetfish is such a fascinating and unique polish, but it went on kind of lumpy and there is just something "off" about the formula that I couldn't quite put my finger on.  I sort of felt like I wanted the base color to be either just a little lighter or darker (though perhaps then it would not be an accurate representation of a Hatchetfish).  Still, I love the experimentalness of the color.  It definitely makes me think of the deep ocean, fish, and mud.  I will try it again by itself, and maybe use some Glitter Food to see if it lies more smoothly.

Julep Carly, Sinful Colors Love Nails, Nail Pattern Boldness Glitter Food

Posted by Miss.Anthropic | Posted in , , , , | Posted on 4:31 PM

0


(note - this actually looks a little more green than the camera is picking up)

1 coat Essie Ridge Filling Base Coat
3 coats Sinful Colors Love Nails 282
2-3 coats Julep Carly on accent nails
1 coat Nail Pattern Boldness Glitter Food
1 coat Sally Hansen Ultimate Shield

Sinful Colors Love Nails is a drugstore budget polish in a transparent dark teal semi-metallic.  Not a great formula, 3-4 coats for opacity, goes on streaky and a little thick (even though it's so see-through).  Considering you can buy Sinful Colors polishes for $2 or less though, I'm happy enough with it.

Julep Carly is a dark teal (leaning more blue than green) glitter polish in an essentially clear base (it may be a bit blue-tinted, but it goes on transparent from what I can tell).  Small and very small hex glitter, medium to high density.  3-4 coats will be mostly opaque, but you may want a base color to make it easier to remove as well.  Formula is pretty good for a dense glitter, but also a little thick.

(closer to actual color, but still just a little more greenish)

Nail Pattern Boldness Glitter Food is a top-coat for smoothing out the appearance of glitter polish.  It can also be poured into bottles of glitter polish that have "gone flat" to make the glitter suspended evenly again.  So far I am finding it effective, it did significantly smooth out the top coat, and may have done even smoother with another coat.

I love aqua colors and Julep Carly is a very bright, seductive color. Super flattering and pretty on anyone.  It's a cheerful, very showy manicure in the sunlight, but I think it really stands out as an evening color.  Fabulous pick for a dressy night out, it looks amazing under artificial light and I personally like it better as a nighttime polish.

Spiked & Rhinestoned Boots - DIY Craft Project

Posted by Miss.Anthropic | Posted in , | Posted on 8:10 PM

0

I've been drooling over the Gaga-esque spiked heels by designers like Christian Louboutin and Jeffrey Campbell, but they are very pricey and I can't wear heels, especially not stiletto heels, due to my very high arch feet. (Seriously, shoe designers, would it kill you to make heavily embellished *flats* with spikes, studs, and belts?)  It is also winter.

So when I saw these awesome Ugg knockoffs at aeropostale.com during Christmas sales for only $25 (after I bought them, they went down to $22 at one point, and are now sold out online, though your local store might have some left), I thought they would be great to experiment with.  They are very lightweight, not much more sturdy than slippers, but the fur is soft and luxurious for such a cheap boot.  They will be fine for light walking duty on non-snowy/non-rainy days.  Sorry I don't have a before picture, but here they are.

The finished product:


Supplies:
50 3/8" Black Brass Screwback Spikes
720 faux-Swarovski Black Diamond crystal rhinestones (I did not count, but I think I used about 400-500 total?)
Loctite GO2 Glue (which is crystal clear, though not totally invisible, and claims to be shock, water, and temperature resistant)
cheap metal slant-tip tweezers

I got the spikes and rhinestones off eBay.  The rhinestones are not quite as nice as Swarovski, but are definitely glass and not plastic; and the Black Diamond color was not as dark as I was hoping, but they contrast nicely with the black spikes.  They are a little darker than they look in the photos, they look more dark grey or more clear depending on the angle, and like a diamond, they reflect some colors.  The supplies altogether cost almost as much as the boots.


I used my seam ripper to remove the name tags from the back, as I personally dislike obnoxious branding, and it makes the shoes look cheap.  I chose blacked spikes instead of the more common and cheaper chrome spikes because I think they look more fashionable and less punk.  I also chose pretty short ones, partially because I thought they would hold up to stress better, and partially so I am less likely to be kicked out of places by overzealous security guards.


I tried drilling a hole into the boot first so that I could screw and glue the spikes into the boots, but the screws were much too short to punch through.  These boots have quite thick faux fur both outside and inside the whole boot.  So I did not use the screws and instead just glued them.  I used 15 spikes per front and 10 per heel.  I placed them just based on sight and a mental vision, I didn't measure anything, and then left them for 24 hours to dry.


As you can see, I placed a heavy saturation of rhinestones at the front of the boot, thinning out beyond the spikes.  From the spikes down, I applied the Loctite glue directly onto the suede and then placed the rhinestones onto the river of glue with cheap dollar store tweezers.  For the thinned out rhinestones and the ones at the heel, I made a small puddle of glue onto some throwaway cardboard and then used the tweezers to dip the rhinestones in, then placed them on the shoe.

If you look closely, the glue is visible between the stones and smeared a bit on the stones, but it's nearly invisible from a distance.  I'm picky and I don't find it problematic, but you can take more time to neatly glue them individually if you are worried about people seeing the glue.


So far, it seems like the spikes and rhinestones are stuck on there quite tightly.  I will update later with a "field report".

I am also thinking of adding a decorative belt around the leg if I find one that's suitable.  I couldn't find anything I liked in my discard stash.


Suggested improvements for people with more money -
if you're not worried about getting kicked out of places, vary larger and smaller spike sizes
use real Swarovski, possibly with Crystal Cosmojet instead, or a mix of grey and black colors, and possibly with varying sizes

Got less money? -
use plastic jet black rhinestones
use chrome spikes

Julep Hailee, Julep Matte Top Coat, & Color Club What a Drag

Posted by Miss.Anthropic | Posted in , , , , | Posted on 1:15 PM

0

1 coat Essie Ridge Filling Base Coat, only on accent fingers
2 coats Julep Hailee OR Color Club What a Drag (accent)
1 coat Julep Matte Top Coat


These are both dense colors and almost good with one coat, but I would go with 2 or 3.

Julep Hailee is a matte polish, dark frosty olive green.  I don't totally like Julep's matte formula.  It dries very quickly, but it shows flaws easily.  I actually did a manicure with it before, but it wasn't playing well with either my base coat or glossy top coat and turned gummy, melty and wouldn't dry, I had to remove it the next day.

Color Club What a Drag is a very shiny light silver foil.  With a matte top coat, it is still shiny but notably toned down, like aluminum foil with a coating.

I took the pic above about 2 days in.  As you can see, Julep Hailee, even with the Julep Matte top coat, has terrible staying power.  My right (dominant) hand looks much worse.  Big chunks flaking off within short order.  Since I use my hands a lot, I expect to get some light wear off the tips within a few days, but I've had very few polishes flake off from the middle like this.  Not good quality at all.

I guess I will just use this polish for one day use in the future, unless I obtain a matte top coat with much better staying power.  The problem lies with the polish though - neither one of my silver nails have flaked.

New Year's Nails - Julep Vivien & Julep Harper

Posted by Miss.Anthropic | Posted in , , , | Posted on 4:55 AM

0

1 coat Essie Ridge Filling Base Coat
1 coat Sally Hansen Ultimate Shield as base coat
3-4 coats Julep Vivien, OR Julep Harper as accent nails
2 coats SH Ultimate Shield as top coat

Julep Vivien is a champagne gold superfine glitter with medium gold hex glitter chunks, medium density.  Even 4 coats did not achieve 100% opacity, maybe about 90% opacity.  I usually don't care for gold polishes, but this is a very flattering color.  A little classy.

Only annoying thing was the hex glitters wanted to clump on my nails, and go onto the edges instead of the middle, impossible to spread around evenly.  I have a love/hate thing with glitters, but they are super popular this season.

Julep Harper I was actually a bit dubious about when I saw the bottle at first, but I actually really like it.  It's like Julep Portia turned way the hell up - a dense glitter mix of mostly medium aqua, a bit of light gold and bright cobalt, in a aqua jelly base.  Opaque with 3-4 coats.  Definitely "mermaid nails".  A lovely color.  It is bright, yet milky.  This might be fun to try as a matte next time.  It ate up my top coat, as glitters tend to, more than Vivien, but definitely do multiple top coats on both.

Even with all these extra base and top coats, this one is peeling off faster than usual for me, these pics are about 4 days in and I'm probably taking it off tomorrow before I start picking at it and ruin my nails.  Usually SH Ultimate Shield will let me wear a manicure for 7+ days (sometimes over 10 if I don't use my hands much), which is why I use it even though it takes FOREVER to dry compared to other top coats.


Update - WOW Julep Vivien is the hardest glitter I've ever had to remove.  I finally had to resort to soaking in pure acetone for a minute or two!  And that stuff is not supposed to be used on natural nails.  It is very very drying.  My poor nails.  I hope it goes smoother next time if I use just one or two coats over several coats of a base color.  Ugh.  That reminds me why I don't buy many large glitters.

Christmas - Julep & Serum No. 5 Forest Lights (backlog)

Posted by Miss.Anthropic | Posted in , , , | Posted on 4:23 AM

0

Dec 2012.  This is another manicure my camera did not want to photograph.

A nice simple Christmas season manicure.  Base of Julep Diane, a glossy dark Christmas green, most nails coated further by Serum No. 5 Love Lacquer Forest Lights, a multi-size transparent glitter with sparse big chunky green glitter, small green and white glitters, superfine gold glitter and even finer dark sage green dust base.


Color Club Revvvolution & Kleancolor Chunky Holo Black (backlog)

Posted by Miss.Anthropic | Posted in , , , , | Posted on 3:36 AM

0

10/24/2012   Base color is Color Club Revvvolution, which is a black (or dark grey if you prefer) holo, with one coat of Kleancolor Chunky Holo Black on top.

Indoors, the glitter is quite visible (while you cannot really see the holographic-ness), but in direct sunlight, to my surprise, it completely disappears and all you can see is holo.


Apocalyptic Nails - Kleancolor Metallic Green, Kleancolor Chunky Holo, and Cherimoya 2012 Crucify (backlog)

Posted by Miss.Anthropic | Posted in , , , , | Posted on 3:21 AM

0


09/24/2012  Kleancolor Metallic Green, the base color seen here, may be my favorite nail polish so far.  Pictures cannot convey the sheer intensity and glow of this awesomely apocalyptic color.  I adore it immensely.


 Thumb and pointer are additionally coated with Kleancolor Chunky Holo Black.  Chunky Holo Black is a chunky glitter that color changes from orange to bright green (that blends in very nicely with Metallic Green), in charcoal jelly base that actually comes on pretty clear.  I haven't used it by itself though, so it might manifest color if you just painted on a lot of layers of this polish by itself.  It's not super dense, so you would likely need a LOT of layers for opacity.

Pointer is also coated with Cherimoya 2012 Crucify, which is a matte emerald-green crackle polish.  Issue with this last one, however - I just went to check on the bottle (01/03/2013) and have found it completely dried up into a lump inside the bottle even though it is closed tightly and does not appear to have any cracks in the bottle.  This is unfortunate since I only used this polish twice - once to swatch and once on this manicure.  It is a budget brand, but not so cheap as to be okay for just one use.  The other 4 bottles of 2012 I own appear to be okay, but now I'm worried.  I will be sure to report on how things go with those other bottles.  I am really irritated, both by the potential huge waste of money, and because that brand has a lot of unique crackle colors.


Steampunk Nails (backlog)

Posted by Miss.Anthropic | Posted in , , , , , , , | Posted on 1:21 AM

0


Steampunk Nail Experiment 9/12/2012.  Sorry about the blurryness, the camera did not like taking these images no matter what I tried.

This is my first try with nail brushes.  Did not turn out too great, I'm not much of an artist, but it was fun to try.  Base was Ulta Salon Formula Chocolate Kiss.  Hand painting was Julep Rachel (which blended in maybe too much) and Konad Special Polish Light Bronze.  Nail decals were a "steampunk" butterfly set off eBay that didn't look anything like what was advertised and is not recommended, and the silver ones are from here and I like them.  Easy to use and looked good.


Close-ups of the nails that turned out better -


 Bonus - Steampunk Nail Experiment #2.  10/07/2012

I'm having trouble remembering exactly what I used here *headdesk*, I'm almost positive the base was Julep Rachel, with accent nail that was silver (not sure which), the silver accent water decals listed above, and a few touches of Serum No. 5 Love Lacquer Forest Lights (find here).  The Forest Lights was quite good on the brown.


Halloween: Models Own Purple Blue Beetle Juice & Joico Hair Color Update (backlog)

Posted by Miss.Anthropic | Posted in , , , , , | Posted on 12:41 AM

0

Sorry I haven't posted in a few months.  I've been making photos but not actually posting, so I'm going to do some quick-and-dirty catch-up posts.

These pics are from Halloween 2012, I dyed my hair just in time for my demon costume.


Hair: mixed 1 tube Joico Vero K-Pak 4FV Wild Orchid, 1/2 tube Joico VeroColor Violet Intensifier (yes that is more than the box says is okay to use, so make your own judgment call if you try it out yourself), 10% tube of Joico Vero K-Pak RRV Really Red-Violet.  It came out pretty awesome, really beautiful red-violet.  Loved it!  The Joico intensifier line really adds to the color.  Though I am going to try a slightly different mix next time (soon), more blue emphasis.  Did not last long at all though, maybe 5 weeks?  But I take very hot showers like you're not supposed to do...
Just a warning, the violet intensifier is super mega extra staining on your bathtub.  Way more than usual.  Prepare for the possibility of having to bleach out your tub later.

 Nails are Models Own Purple Blue Beetle Juice.  Metallic colorshifts from a cool purple, blue, dark red, & chocolate brown depending on the light and angle.  Sunlight seemed to bring out more red and brown, and more purple and blue indoors.

Sign If You Want To Retain The Right To Own Things

Posted by Miss.Anthropic | Posted in | Posted on 12:52 AM

0


Seriously.

The Supreme Court wants to take away your right to resell the items that you have bought and paid for.  They think corporations should actually just "rent" things to you.


Botched Mani - Color Club Wild at Heart + First Konad Stamping m57

Posted by Miss.Anthropic | Posted in , , , , , | Posted on 6:22 PM

0

I just got a bottle of Color Club Wild at Heart and it was so pretty I just had to try it out right away!  Wild at heart is a cool medium-dark violet purple rough chrome 'scatter holo' with a charcoal grey base -- with magenta duochrome and scatter holo that only shows up under intense light.  The purple kind of rises above the charcoal to make it look more purple and shiny, but if you rub over the polish with acetone, it reveals a flat grey.


I put on 1 coat of Essie Ridge Filling Base Coat, then 2 coats of Wild at Heart.  Wild at Heart was great to apply, good brush and I probably could have just done 1 coat if I wanted to, high opacity.  Love it.  I have to try this polish with a matte top coat sometime for sure.

Then I decided to finally try some konad stamping out.  I got out my m57 plate - the only one I have right now - and the konad stamper and scraper.  I stamped on the lace design on the far top right of the plate.

I let Wild at Heart dry, but did not use a top coat.

On my left hand, I stamped with Wet n Wild Fastdry Buffy the Violet Slayer.  Unfortunately, the colors are too close in color, and it does not show up well at all.  From what I can tell though, it stamped on quite well right from the get go, though, so I will try that polish stamped on something else soon.

So, I decided to try stamping on my right hand with the new Konad Special Polish Light Bronze, which is a charcoal/bronze duochrome.  Despite my best efforts, this one was not picking up well at all.  And it got worse the more I tried.  But I will try it again sometime, maybe with a different design or different plate.  I also have not tried to file my stamper yet. But I suspect the problem lies with the polish.  I can always just use it as a straight-up polish though, it's an interesting color.  Could be good with steampunk outfits.

Anyway, this turned into a messy experiment, but I like Wild at Heart and stamping is surprisingly easy.  Oh dear, now I want to go on plate buying spree...


Nicole by OPI My Lifesaver & Julep Portia

Posted by Miss.Anthropic | Posted in , , , , | Posted on 1:00 PM

0

This week, I applied 2-3 coats of Nicole by OPI My Lifesaver over 1 base coat of Essie Ridge Filling Base Coat, with one light coat of Julep Portia on top.  I think I might have gotten a bad or tampered-with bottle of My Lifesaver from drugstore.com because it was like trying to apply Elmer's Glue, thick and gummy.  Bleh.  I will try to put in some nail polish thinner next time to see if I can save the bottle from the trash (lol name irony).
I kind of wish I had bought a bottle of China Glaze For Audrey instead, My Lifesaver was less of the robin egg blue I wanted, and more greenish.  It's a little too bright or something, it just doesn't have a flattering look.  The Portia glitter helps a little though, for me, gives it more of a 'day at the beach' look.  This is maybe a good polish for those trying to do more of a "doll" or "lolita" look.

I had to do 3 coats of the polish to even it out, it goes on very opaque, but shows brush strokes way too easily.  It went on very messily, despite efforts to smooth it out.  I didn't bother with much of a top coat or cleaning it up well because I plan on changing polish soon.  Can't wait to try out the new Julep America the Beautiful!

Purple Hair Joico Vero K-Pak Chrome V4 Passion Fruit & RRV Really Red-Violet

Posted by Miss.Anthropic | Posted in , , , , | Posted on 5:25 AM

3

I am dying my hair purple over a bleached base for the first time in over 10 years.  I used to dye my hair pink and purple with cheap youth-market products like Special Effects back in college.  I've dyed my hair various shades of purple brown and red brown and pink brown with 30 or 40 developer to keep my hair more in line with "employment-friendliness" since then.  But as you probably already know, on dark hair, it will only result in highlights, or being able to see the color in the sun.  But I am ready to try more intense purples again.

I have been coloring my hair since I was a young teen, but I am not a pro.  I just try new things and still figuring out what works the best for me.  The only sure advice I can give you is to avoid those drugstore box dyes and get fresh pro supplies from a pro supplier like Sally Beauty or through internet retailers.  Also, you get what you pay for IMO - on average you will get more attractive results from more expensive pigment and developer because the colors are more complex.  You can get all the supplies your salon has and do your own hair for way less money.  And salons are not perfect, I've seen and myself experienced bad dye jobs from the so-called pros.  Once you learn the basics of what gets mixed with that, you just have to figure out what colors look best for you (is it ash-base? red? neutral? etc, all shades have base notes, some will look better and more natural on you than others).


Step 1: Create Bleached Out Base Hair

This is my natural hair color (darkest brown) with only about 2 inches of virgin hair at the scalp, the rest has been dyed at least once.  I do not dye every month, more like every 3-4.  My last color was Pravana Chromasilk Intense Violet Brown.



This is my first time using Joico hair color.  So, I first bleached my hair with Joico Vero K-Pak Creme Lightener + 30 vol. developer (1:1) for about an hour from start to finish, from nape to front.  I sectioned off my hair into 3 and tried to work as quickly as I could.  It did not take very long for the virgin hair to go golden blonde, but as you can see from the picture, the previously dyed hair is not working well with this bleach.

After an hour, I decided to go and and rinse and then redo the darker bits later, for fear that I would lose too much hair if I left it.
Very disappointing!  The level of lightening is not good for an hour of bleaching.

The next day I rebleached with the Creme Lightener + 20 vol. developer (in concern for my hair quality...though I wonder if I should have gone with 40 vol. to begin with).  This time I left it for an hour and a half.  So this is now 2.5 hours total.
It did get lighter, but there is still a huge difference between the virgin hair and the previously-dyed hair.  The first pic shown is a little dark and the second is a little light, but the second go-around did even out a little more than the first round, although I think I still somehow managed to miss a stray dark strand here and there.

I can really only recommend this bleach for virgin hair.  I think I got better results in the past trying to bleach out non-virgin hair using blue powder type bleach.  I am worried that the purple is now going to be very uneven, but I am not bleaching a third time.  The damage is not terrible, but my hair is definitely going to need some TLC now.

Pros:

- bleached out virgin hair fast and evenly
- less damage than usual to hair texture
- did not itch or burn the first go-around!
- chemical smell is not unbearably strong, comparatively mild
- very little hair fell out


Cons:

- way more expensive than powder bleach
- super fail-y at bleaching non-virgin hair
- and, one really big con, for me, is how incredibly difficult this was to rinse out. Basically both times I used it, with 2 different brand developers (one cheap, one expensive), it turned into a slightly gluey, super oily sludge that stuck to my hair and skin like I couldn't believe. You have to rinse this stuff FOREVER, and I had to shampoo my hair with big handfuls of lathering shampoo THREE times, and then I had to scrub and scrub all my skin twice with a scrubby sponge. It also made my tub bottom dangerously greasy. I think it must have super thick oil that protects your hair from damage, but is also a gigantic PITA to deal with. So I will not be buying this lightener again when it runs out. I would rather have more damage than this gunk clogging my pores.
If you have virgin hair only and you are super concerned about damage, give it a try, but I am not kidding about making sure you really rinse and scrub yourself or you will be hopping back in the shower to redo it.

If you don't have virgin hair, maybe try 40 vol. developer and/or use a hair color remover first like "Color Oops".  I did not have to use a hair color remover previously, so I did not, but next time I re-color all my hair, maybe I will give that a try.


Step 2: Add Color

The recipe I am trying out is -
4/5 (full tube) Joico Vero K-Pak Chrome V4 Passion Fruit
1/5 (.5 oz) Joico Vero K-Pak Chrome RRV Really Red-Violet
+
1:2 ratio (5 oz) with Vero K-Pak Chrome Activator Creme Developer (deposit only developer, does not lift, has no "volume number")

About 8 oz of color is right for me, but I have extraordinarily thick hair that sucks up the mix like a sponge so I have to slather it on thick.  I would need even more if I had longer hair.  I have always had to double or triple portions/boxes.  If you have shorter and/or thinner hair, adjust accordingly.

I could not find the link again, but I got the mix recipe from someone else's blog or forum comments somewhere on the intertubes. My goal was to have a somewhat red-toned dark purple, like basically a darker red-plum.  When I mixed everything, the mix looked the right color (like hex code 660022, for reference).  The RRV is a very very strong pigment, and should definitely be using sparingly, like I did, unless you are after more of an intense red with purplish tones.  Passionfruit looks like a cool light blue-purple from the tube, and if you just used that color, I am not sure if it would be a red-purple or a blue-purple.


- mixed smoothly and evenly with ease (not technically a big deal, I've had no issues using lumpy color, but it's sort of a pet peeve with me)
- dyed evenly over a non-even base
- almost no smell, seems to have some kind of nice smelling added perfume also
- not irritating to skin beyond the annoying wet feeling
- did not seem particularly damaging, seemed like no more hairs fell out than normal rinse
- very little skin staining (just on the nape of my neck, should come out fine on next bath, probably only noticeable because I am looking for it)
- rinsed out reasonably easily

Important: colors like these will often super super stain your skin and your stuff, be careful about splattering it everywhere!  This also includes your bathtub when you are rinsing it out, so check over and clean that tub ASAP or you may not be able to get the stains out later.

I applied this the same way, sectioning off my hair and working back to front.  I massaged the mix into my hair a little when I was done, then covered with a plastic cap.  Left it in for about four hours (from start of application).  The color mix turned a super dark purple shortly after applying.  Over time, my plastic cap actually developed steamy water droplets all over inside, which has never happened before (dunno what it means, but interesting to me), and inside the cap the mix stayed very moist and wet.


Here is my hair air dried, no styling.  The color result matched pretty close to the dye mix color.  It did turn out just a little more red, and more dark, than I desired, but these things are always a crapshoot the first time, and I'm generally pretty satisfied.  It will soften after a few shampoos, and it always takes me a little while to figure out if I like a dye job or haircut, anyway.

I am surprised at how much of a black base this haircolor has.  It's very multifaceted and changes color quite a lot as it moves, and you can see what looks like pure black strands at times.  However - it came out extremely evenly and you totally can't tell any color differences at either end, and I definitely can't say that even about some simpler dye jobs I did over non-bleached hair in the past.  It looks like an expensive and professional dye job (not sure if it looks that way in the photos).

This is actually the most expensive at-home job I've ever done, around $65, although most ingredients aren't used up, so next time repeat will be much cheaper.  A Joico dye job at a salon would be approximately twice that cost, at least.

The last 2 inches of my hair is a little dry and straw-like, but for having bleached my hair over two hours, it's really in great shape, from my experience.  I only used normal conditioner (which I rinsed a lot) and very light leave-in conditioner and I was able to easily brush through my soaking wet hair completely snag-free.


Disclaimer: I am not a professional.  Hair color is risky.  You can lose your hair, develop an allergic reaction, or have other weird freak results sometimes.  I am not liable for you copying me, do so at your own risk.

Nabi Magnetic Nail Polish 04 Cinnamon

Posted by Miss.Anthropic | Posted in , , , | Posted on 6:22 PM

0


Nabi is a cheaper magnetic nail polish.  I picked up a few colors on eBay.  It has a couple of magnet designs on the bottle top, you get a specific design with different color choices, but I actually used one of the magnets from a 3-set I picked up on eBay that are supposed to be stronger.

Cinnamon is the second color I've used of Nabi (the first being Lilac, which is a deep blood red) and so far I honestly like them better without the magnet.  The polish is super thick and difficult to work with and it looks better as one even, thin coat because it is so highly pigmented you really don't even get a better look with more coats.  Cinnamon did not produce very much color differentiation with a magnet design.
Cinnamon is a fascinating color.  In my perception it is a duochrome of light plum and frosty chocolate, with silver metallic and some hints of pink and orange in the tone.  It constantly changes color depending on what light it is in, and with movement.  It is really unique.  The magnet brings out a little more plum in the stripes.

Nabi polish colors do not really match the names at all, FYI.

Nabi chips easily at the edges, but with a good top coat it will stick for weeks.  I did not put a top coat on this one, because I already plan to repolish with something else in a few days, so it already chipped some just from showering.

Sally Hansen Chrome Nail Makeup in 48 Purple Diamond Chrome & Julep Nail Vernis in Portia

Posted by Miss.Anthropic | Posted in , , , | Posted on 5:58 PM

0


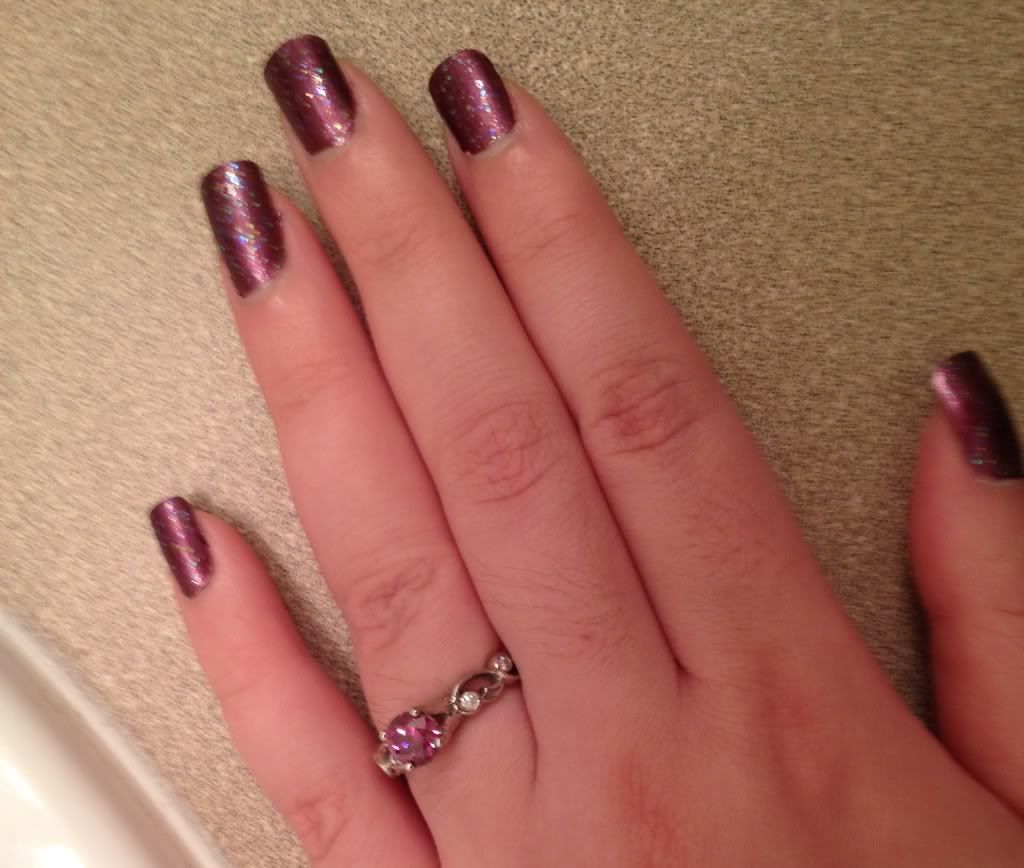
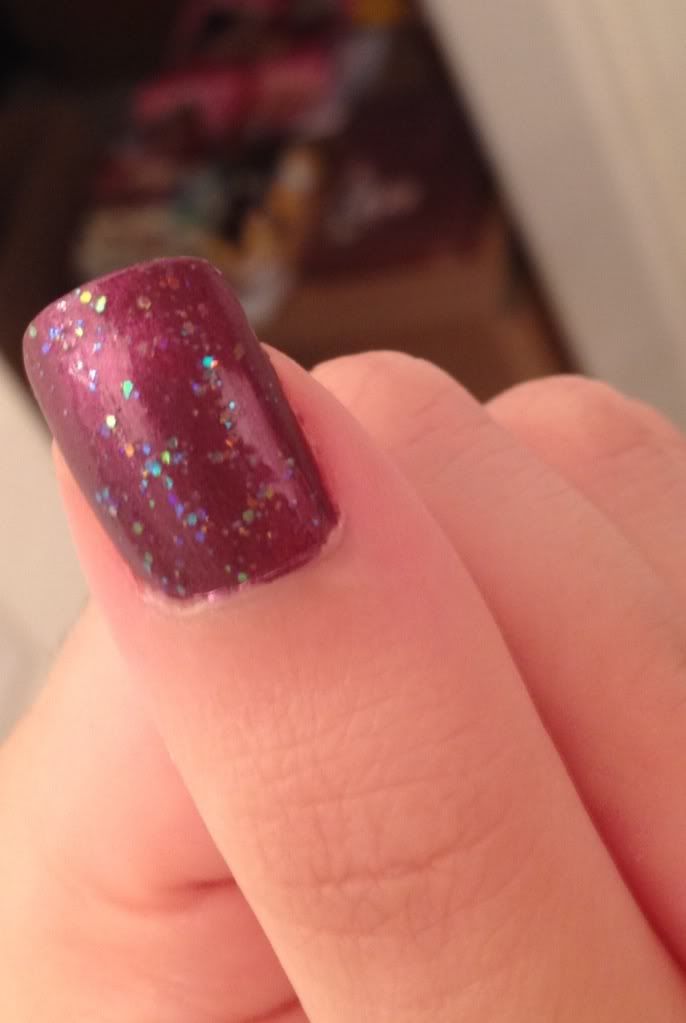
I was recently feeling nostalgic about Sally Hansen Chrome nail polish, so I picked up a few on eBay.  This particular one was a bit of a disappointment.  It's not really chrome.  It is more of a metallic that you could mistake as normal nail polish.  It's sort of a dark plum purple.  I thought it looked a bit boring by itself so I slapped on a coat of Julep Portia aqua glitter. It's a nice glitter, it seems like it would go with a lot of things.  I just became a Julep Maven this month and I will make another post on my first month's package soon.

And then one coat of Sally Hansen Ultimate Shield.  I'm hard on manicures, so I almost always do a top coat.  Also did a base coat of Essie Ridge Filling.

Much to my amusement, I happened to kind of match my manicure to my wedding ring, as you can see from the top pic.  I did not do this on purpose.  I wasn't sure what exact color I would be getting with this nail polish.  It's okay, but I'm not enamored with it.  It went on a little too thick and it was significantly streaky whether I tried to apply it thinly or thickly.  I had to do 2-3 coats to mask the streaks.  Luckily as it dried the streakyness minimized a little.